Azure Functions provide the unique opportunity to develop cloud-based applications that are scalable, elastic, and resilient without worrying about the backend infrastructure. These features are all handled by the Azure host with minimal configuration, empowering the developer to focus on code. Azure Functions provide a consumption-based subscription model that, when coupled with inexpensive storage options, facilitates a low-cost solution that will automatically meet peak demands while accruing zero cost when idle. The Azure Portal makes it easy to both develop and integrate functions with other assets such as storage and databases.
For this article, the scenario is implemented that allows customers to subscribe to an email list via text. The customer first texts their desire to subscribe, then provides an email address. This example stores the requests in Azure Table Storage but you can use it to leverage other resources such as Azure SQL or DocumentDB as well. You can even write an Azure Function that triggers on the table insert and sends the email to a third-party system.
To get started, you must have an Azure account. If you visit https://azure.com there are often free offers with credits to get started. After you have a valid account, the next step is to create a resource group. In Azure, resource groups are containers for related resources. They can be deleted as a single unit, are a logical boundary for security, and provide an aggregate summary of costs associated with the resources that comprise them.
From the Azure portal (https://portal.azure.com/) navigate to “Resource groups” then tap “Add” to create a new resource group. This example uses “FlowrouteResources” for the name. Pick a location and subscription, then tap Create. It should only take a few seconds for the resource group to be provisioned. Navigate to the resource group, then tap “Add” and search for “function” to add a Function App to the resource group as shown in Figure 1.
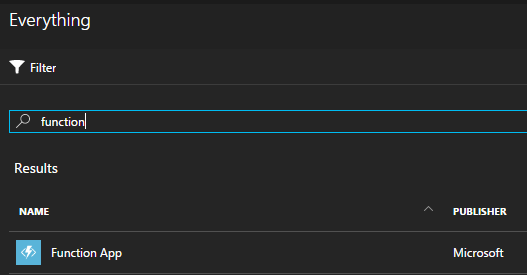
Figure 1: Function App
Give the app a name (this example uses “flowroute”), choose “Consumption Plan” for the hosting plan, pick a location, then tap on the Storage Account section. Functions require storage to persist configuration and logs. This example will leverage the same account to store subscription requests. For this demo, the storage was named “flowroutestorage.” Tap OK after choosing a unique name. Your Azure blade should look like Figure 2. Tap Create to deploy the storage and function app.
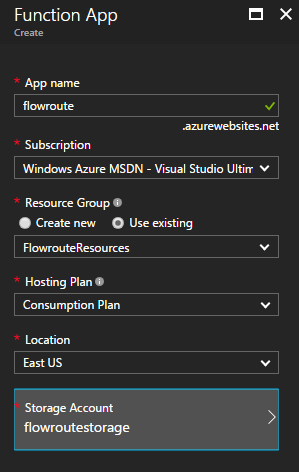
Figure 2: Create Function
It will take from a few seconds to several minutes to provision the app and storage. View the resource group and use the refresh button to track progress. You will receive an alert when it is provisioned and your resource group will look like Figure 3. Tap on the function name to begin editing the function.
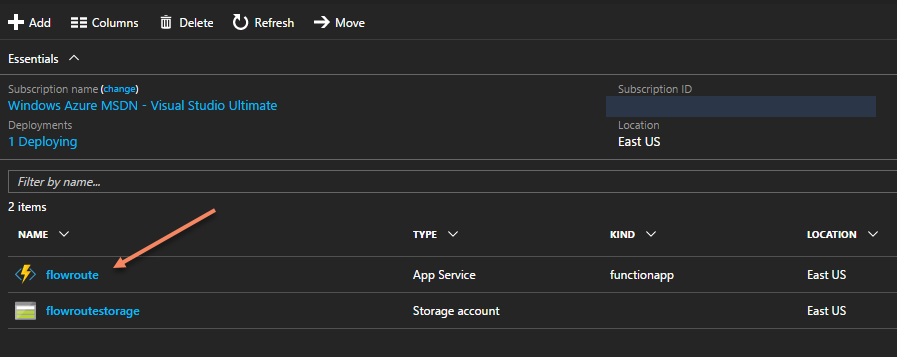
Figure 3: Choose Function
Once you tap on the function app, you can choose “New Function” on the left to continue building it. For this example, choose “JavaScript” as the language, “Core” for the scenario, and the “HttpTrigger-JavaScript.” Give it a logical name like “FlowrouteCallback” and specify anonymous authentication. Now you can add the code for your function. Start with something simple:

Click the link in the upper right to “Get function URL” and copy the URL to your clipboard. In the left navigation, tap “Monitor” to view logs.
In a new browser tab, navigate to https://manage.flowroute.com/ and log in. Choose “Preferences” and “API Control.” Paste the function URL into the “SMS Callback” input box and tap the “Enable SMS” button. This instructs Flowroute to call your function anytime a message is texted to one of your Flowroute numbers. Pick a valid, text-enabled Flowroute number and send it a text message. Refresh the logs in the Azure portal and you should see the message details as shown in Figure 4.
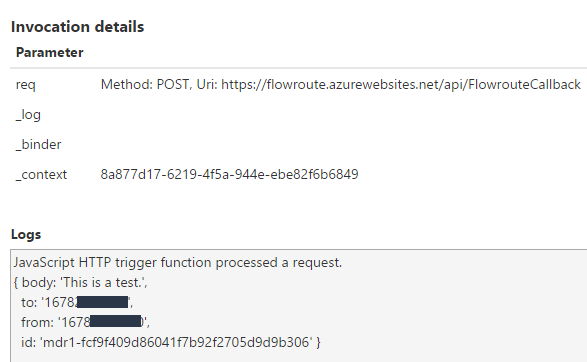
Figure 4: SMS Callback
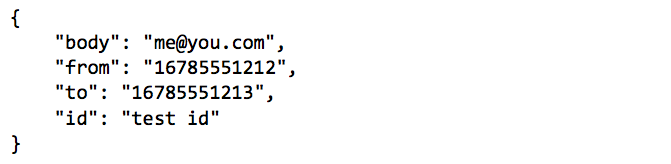
You don’t have to trigger a callback via your phone to test the function. Expand the right panel and tap on the “Test” tab. You can set the HTTP method to “POST” and create a request body, then use the “Run” button to test it locally. This is an example request body:
The function already has associated storage, so the next step is to leverage the storage for a workflow. In general, the logic for the API will look like this:
– Did the user type “subscribe” as the text message?
– Yes, does an entry for the phone number already exist?
– Yes, inform the user they already requested a subscription
– No, add the users’ phone number to the request table and ask them to text their email
– No, does an entry for the phone number already exist?
– Yes, does an email for the phone number already exist?
– Yes, inform the user they already subscribed
– No, add the user’s email to the email table and inform the user they have been subscribed
– No, nothing to do
To implement this algorithm, two tables will be used. The “requests” table will store the message id of the “subscribe” request from a phone number, and is necessary to be present before an email will be accepted. The “emails” table then stores the email for the phone number. It is assumed the user texted a correct email. For production, extra validation should be added to ensure the email address is valid.
Azure Functions manage the connections to the tables and even retrieve records for you. First, configure the “inputs” to read entries from the tables to see if the user (a) requested a subscription and (b) registered an email. From the Azure Function design blade, tap “Integrate” on the left navigation.
Under “Inputs” tap “New Input.” Choose “Azure Table Storage” and tap “Select.” For “Storage account connection” tap “new” then click on the storage account you created earlier. This will auto-generate and save a connection string for you. Select the storage account connection string. It will now be available for future settings and you won’t have to choose “new” again. Type “requests” as the table name. In table storage, each entity is accessed via a partition key and a row key. Input “flowroute” as the partition key. The row key will map to the phone number of the user that is passed in the body of the request, so specify “{from}”. Set the maximum records to 1. Your dialog should look like Figure 5.
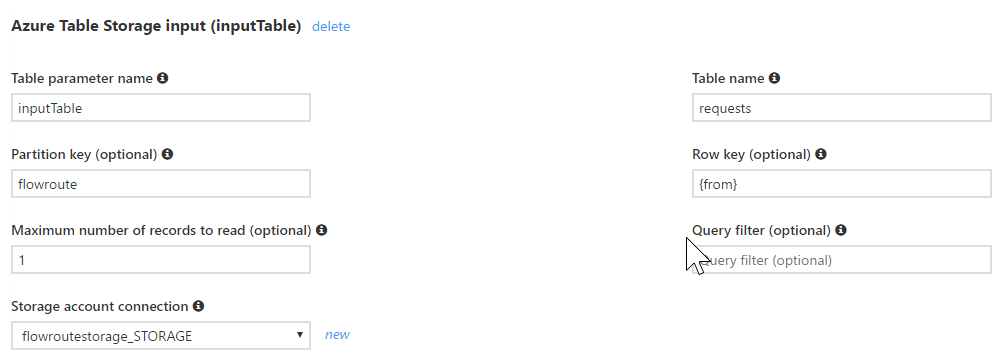
Figure 5: Input Table
Save this input. Now create a second input the same way and choose the same storage account connection, but specify “inputEmail” for the table parameter name and “emails” for the table name. The partition key, row key, maximum number of records, etc. are the same. Be sure to save the input when you are done.
Now you have two “input bindings” that will automatically populate with the from phone number when your function is called. This will trigger a read for the table, and the parameter name will either contain the record on a successful read or be set to null if it doesn’t exist. Add this code to the Azure Function before it sets “context.res”:

This will show you “false” for name and email because no entries have been inserted yet, or will throw an exception if something is not configured correctly. Make sure this is working before you continue.
Azure Functions also support “output bindings” that allow you to insert entries. Back on the Integrate tab, tap “New Output” under the “Outputs” column. Choose Azure Table Storage. Give the first parameter a parameter name of “outputTable” and a table name of “requests.” Choose the same storage connection you used for inputs and save it. Repeat this for a second output, with parameter “outputEmails” and table “emails.” Save these outputs.
Now you can update the code as shown. There is an empty method that will be updated later to send a message back to the client, but for now, the code is set up to work with the Azure Table Storage:
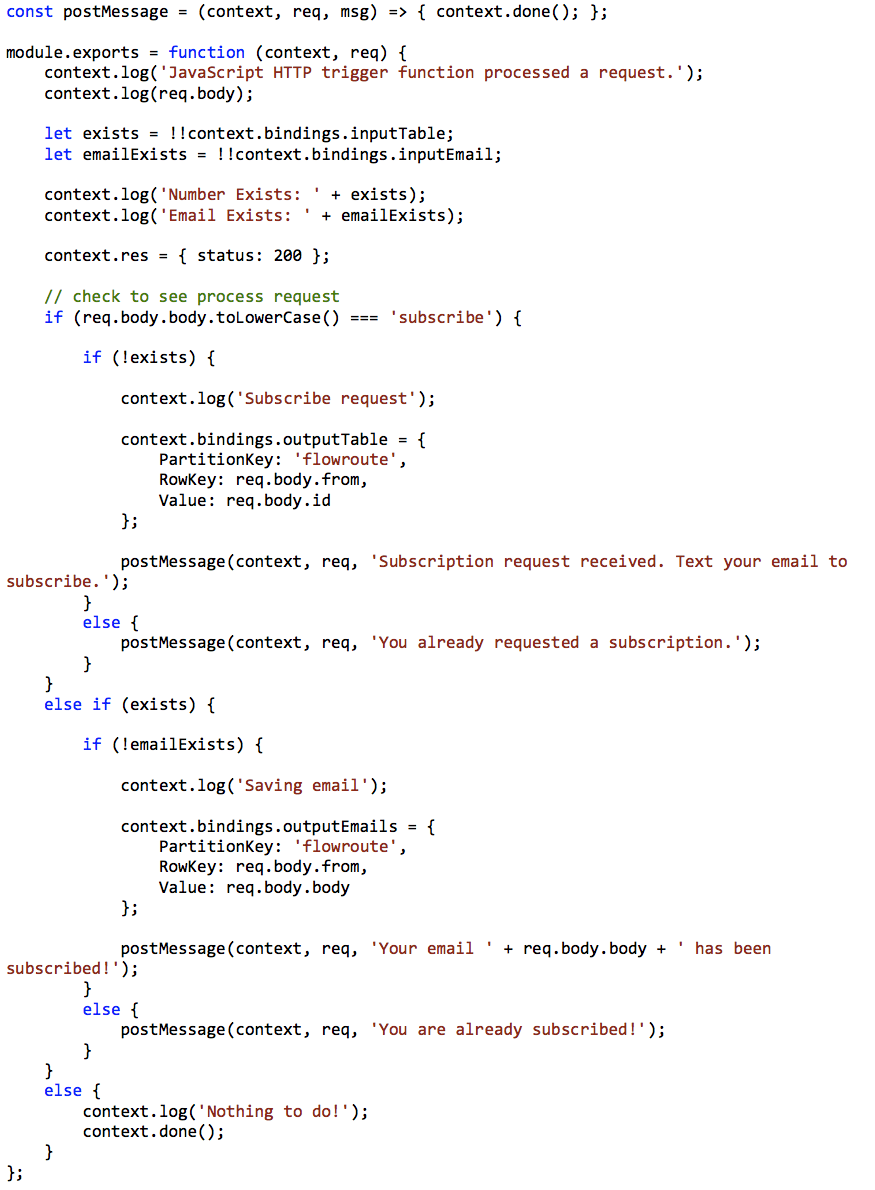
Notice that inserting a new entry is as simple as using the parameter names to set an object on the bindings. When the context is closed, the object is written to the table. Test with the message “subscribe” and call it twice. The second call should set “number exists” to “true.” Change the message to an email address, and call it twice again. The second call should show both “number exists” and “email exists” as true.
To see what’s going on and clean up test records, download the Microsoft Azure Storage Explorer: http://storageexplorer.com/. Log into your Azure account and navigate to the storage. You can use the tool to view records and delete them. An example record is shown in Figure 6.
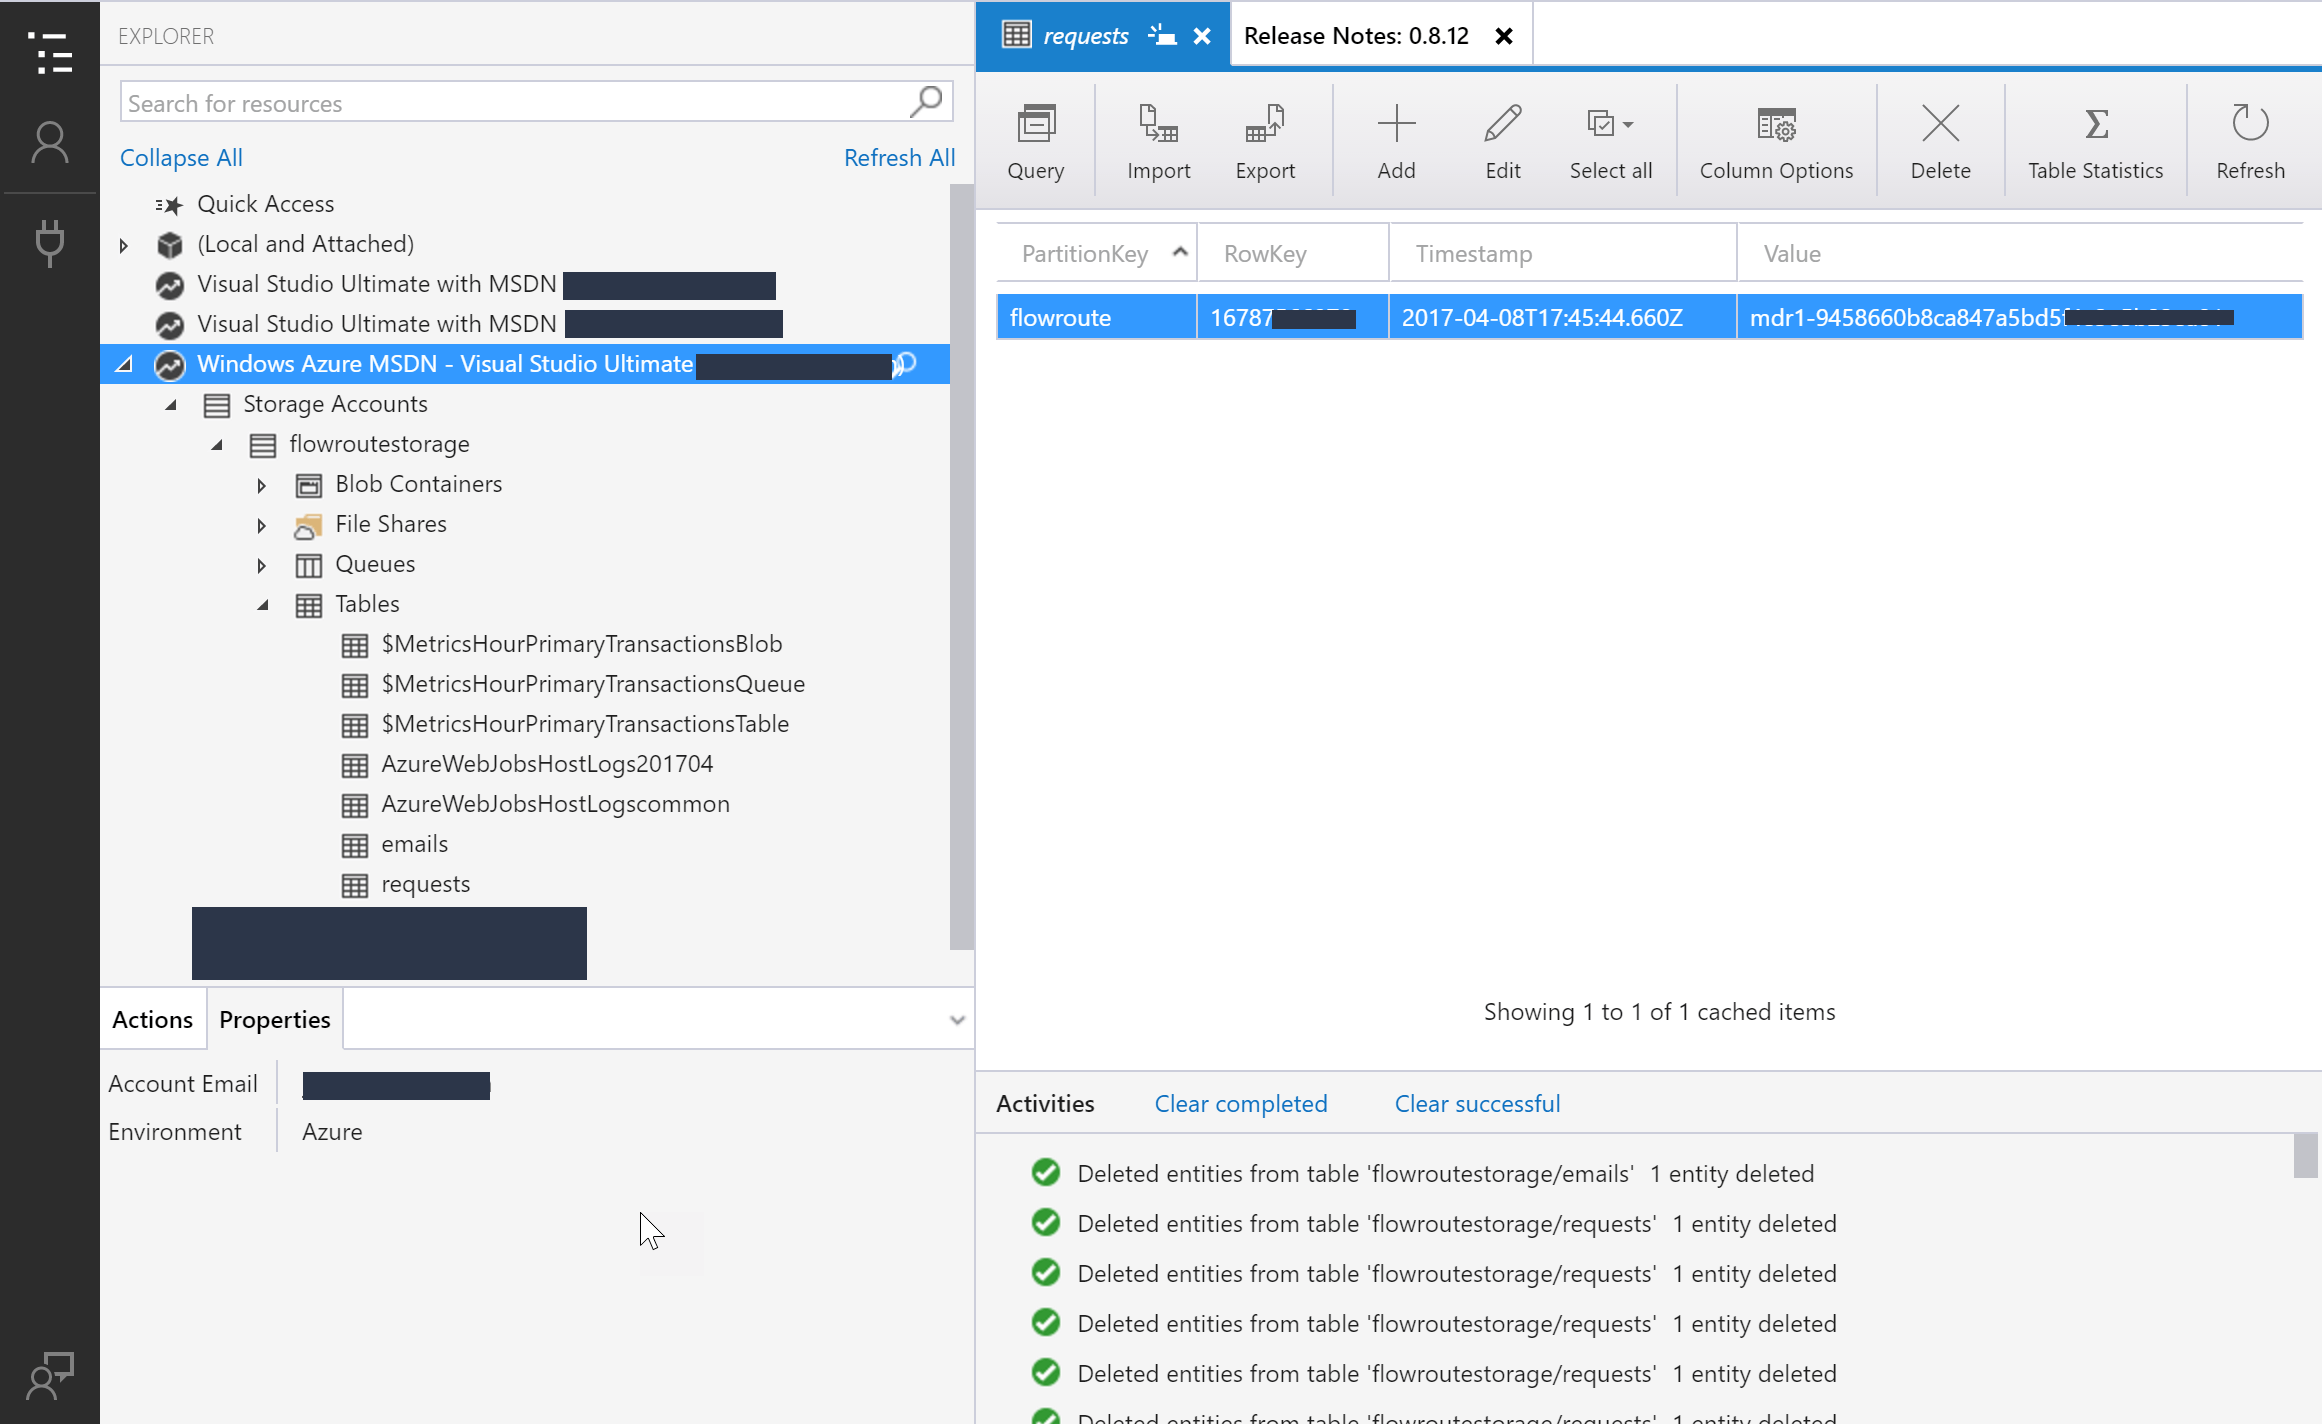
Figure 6: Storage Explorer
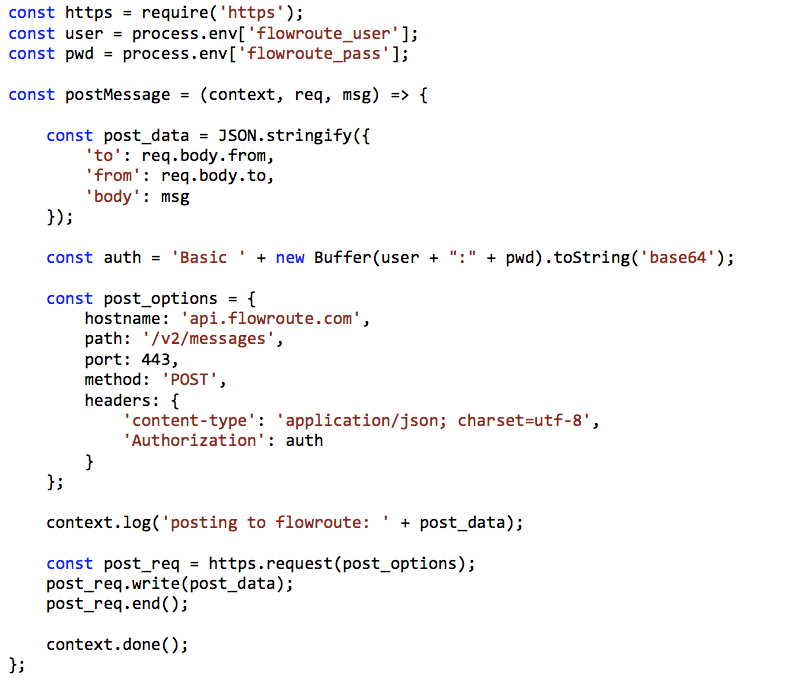
The next step is to update the function to respond to the user by invoking the Flowroute Messaging API. Navigate to https://manage.flowroute.com/accounts/preferences/api/ and write down your access key and secret key. In the Azure Function, tap “Function app settings” in the left navigation, tap “Configure app settings” and then scroll down to the “app settings” section. You should see some keys already set, such as the connection string for storage. Add a key named “flowroute_user” and paste the access key, then add a key named “flowroute_pass” and paste the secret key. Tap “Save” and wait for the confirmation that the save succeeded.
After the keys are saved, implement the callback. You’ll import the “https” module to make the call, grab the the secrets from the environment for authentication, then compose a message and post it. The implementation looks like this:
Now you’ll want to pull out your phone for a true test. You should be able to text “subscribe” to a Flowroute number, receive a request to send an email, then text an email and, finally, verify it exists with the storage explorer. An example session is shown in Figure 7.
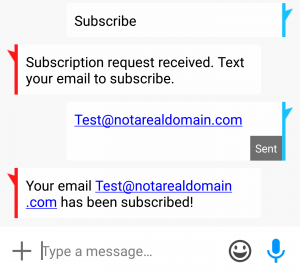
Figure 7: Text Session
The Azure Function you just created will scale automatically. You can track your code in source control without revealing secrets such as connection strings and set up automated deployments. You only maintain the code and will not have to worry about patching the host OS, configuring a VM or even managing containers. For the article demo, testing and troubleshooting cost an entire penny. You can further enhance the service by validating email, adding logic to enable users to update their email or unsubscribe, and even triggering other actions to share emails with other apps you may have in place to confirm the subscription and start sending emails.
Welcome to the world of serverless applications!